Americans purchase approximately 6.5 billion greeting cards each year, according to the Greeting Card Association. Physical cards aren't an obscure alternative to messaging. They're an everyday way to mark relationships, and adding a personal photo makes the production choices more consequential.
A meaningful picture can still print soft, lose a face to the crop, or arrive after the occasion. The practical approach to personalized greeting cards with photo uploads is to treat each card as a small print job: choose the right production route, prepare the image, approve the layout, and leave enough time for mailing.
Table of Contents
- Photo Card Options Compared at a Glance
- Photo Size, Resolution and Color Before You Upload
- Layout and Typesetting Examples for Portrait and Landscape Cards
- Writing the Message Without Losing the Personal Touch
- How to Upload and Preview Your Photo Card
- Plan Your Order Around the Delivery Date
Photo Card Options Compared at a Glance
Every personalized photo card reaches the recipient through one of three production routes: a managed service, a retail print-on-demand card, or home printing on cardstock. The difference is who does the physical work and how much control you keep over format and final cost.
Photo card options by format, cost and who handles mailing
| Option | Card format | Printing, postage and cost | Your control |
|---|---|---|---|
| Mail This AI-assisted photo card | Planned folded card, 125 × 175 mm, portrait or landscape | Cardly prints, packs, addresses and mails it; $9.99 per card includes the envelope and domestic postage, with tax shown before payment | Assistant drafts wording and artwork; you approve the design, recipient and total before payment |
| Retail print-on-demand photo card | Choose from the retailer's offered folded or flat templates | Retailer prints; direct mailing or delivery to you follows the selected service. Per-card price and delivery fee appear only at checkout, so compare the final total with the managed option | Template-based design; editable message areas may exclude fixed greetings |
| Home printing on cardstock | Set by your printer and paper | You print, assemble, address and post it. Your cost is paper, ink, envelopes and postage, which you can total before printing | Full control over paper and layout, within your printer's limits |
Choose who should handle the physical work
The managed-service route suits a sender who wants help moving from an idea to a finished envelope. You supply the photo, edit the wording, and approve the preview. Cardly then handles production and postal handoff, so you don't need cardstock, envelopes, printer supplies, or a trip to post the card. You see an estimated arrival window and order status after mailing, with no guaranteed delivery date, so treat the estimate as a planning input rather than a promise.
That convenience comes with boundaries. You choose within the offered format rather than specifying every paper and finishing detail. Check destination eligibility early: coverage includes eligible U.S. states and Washington, DC, and excludes New York State, U.S. territories, and military addresses.
Retail print-on-demand works well when you like an existing template. Inspect its editable areas before committing, because a fixed greeting on the front may not match the message you want inside. Confirm whether the retailer mails directly to the recipient or ships the finished cards to you, since that choice changes both the timeline and the total you see at checkout.
When home printing makes sense
Home printing gives you direct control over paper texture, experimental layouts, and handwritten additions. It also makes you responsible for feed problems, ink compatibility, folding, envelope fit, and addressing. Check your printer's supported cardstock before buying paper, not after a sheet jams.
The choice between folded and flat formats matters too. This guide to types of greeting cards can help you pick a structure that fits the occasion.
Practical rule: Choose managed fulfillment when someone else should handle printing and postage. Choose home printing when hands-on control matters more than convenience.
Photo Size, Resolution and Color Before You Upload
Judge the photo by its pixel count at final print size, not by the DPI number stored in the file. Changing a resolution label doesn't restore missing image detail.
WhiteWall's image-optimization guidance recommends approximately 300 pixels per inch at final size; at that density, a 125 × 175 mm card needs roughly 1,476 × 2,067 pixels, with the other reference dimensions below calculated on the same basis.
Pixels needed for common card and print sizes at 300 PPI
| Print size or photo source | Pixels at 300 PPI | What it means for your card |
|---|---|---|
| 125 × 175 mm folded card | 1,476 × 2,067 | Target dimensions for the final image area, before allowing for additional cropping |
| 5 × 7 in card | 1,500 × 2,100 | Slightly larger standard card with the same portrait proportion |
| 4 × 6 in print | 1,200 × 1,800 | Suitable reference for a small insert or keepsake print |
These are finished image-area targets, not a guarantee that an uncropped file will work. A large photo may lose substantial detail when you zoom into a small face. What matters is the number of pixels left in the selected crop.
Crop before you judge sharpness
Open the original file in your phone's photo editor or a desktop editor and inspect its dimensions. Avoid using a screenshot of the photo, a social-media download, or an image copied from a messaging preview when the original is available.
Match the crop to the card's portrait or horizontal proportions. Keep faces, hands, and meaningful background details comfortably inside the visible area, with room beyond them for trimming. If the template shows bleed, extend the background into it while keeping important content within the safe area.
The fold belongs at the boundary between panels on a conventional folded card. It doesn't normally run through the middle of the front photograph. Use the actual template guides rather than guessing where the fold will land.
If the selected crop lacks detail, place the image smaller or choose another photo. Careful upscaling can make an enlargement less objectionable, but it can't reliably recover a facial detail that wasn't captured.
Keep the color workflow simple
JPEG, PNG, and WebP are practical upload formats for this service. A high-quality JPEG is a sensible choice for a photograph; avoid repeatedly saving it at low quality, which can introduce visible compression around edges and skin detail.
The International Color Consortium's explanation of profiles describes how profiles connect device-dependent colors to a device-independent color space. For consumer uploads, sRGB is a sensible default, while the printer should handle conversion to its paper-and-printer destination profile.
Preserve an existing profile unless you're deliberately converting the file. Don't assign a different profile merely to make the preview look brighter, and don't add an extra printer conversion yourself.
Ask whether the preview offers a full-resolution crop inspection and a low-resolution warning. A normal screen preview helps with composition, but it isn't a reliable paper-color proof unless it represents the actual print process.
Layout and Typesetting Examples for Portrait and Landscape Cards
Think of the photo as the picture and the message as its mat. The mat should give the picture room, not compete with it. A strong layout separates the emotional work of the photograph from the reading work of the words.
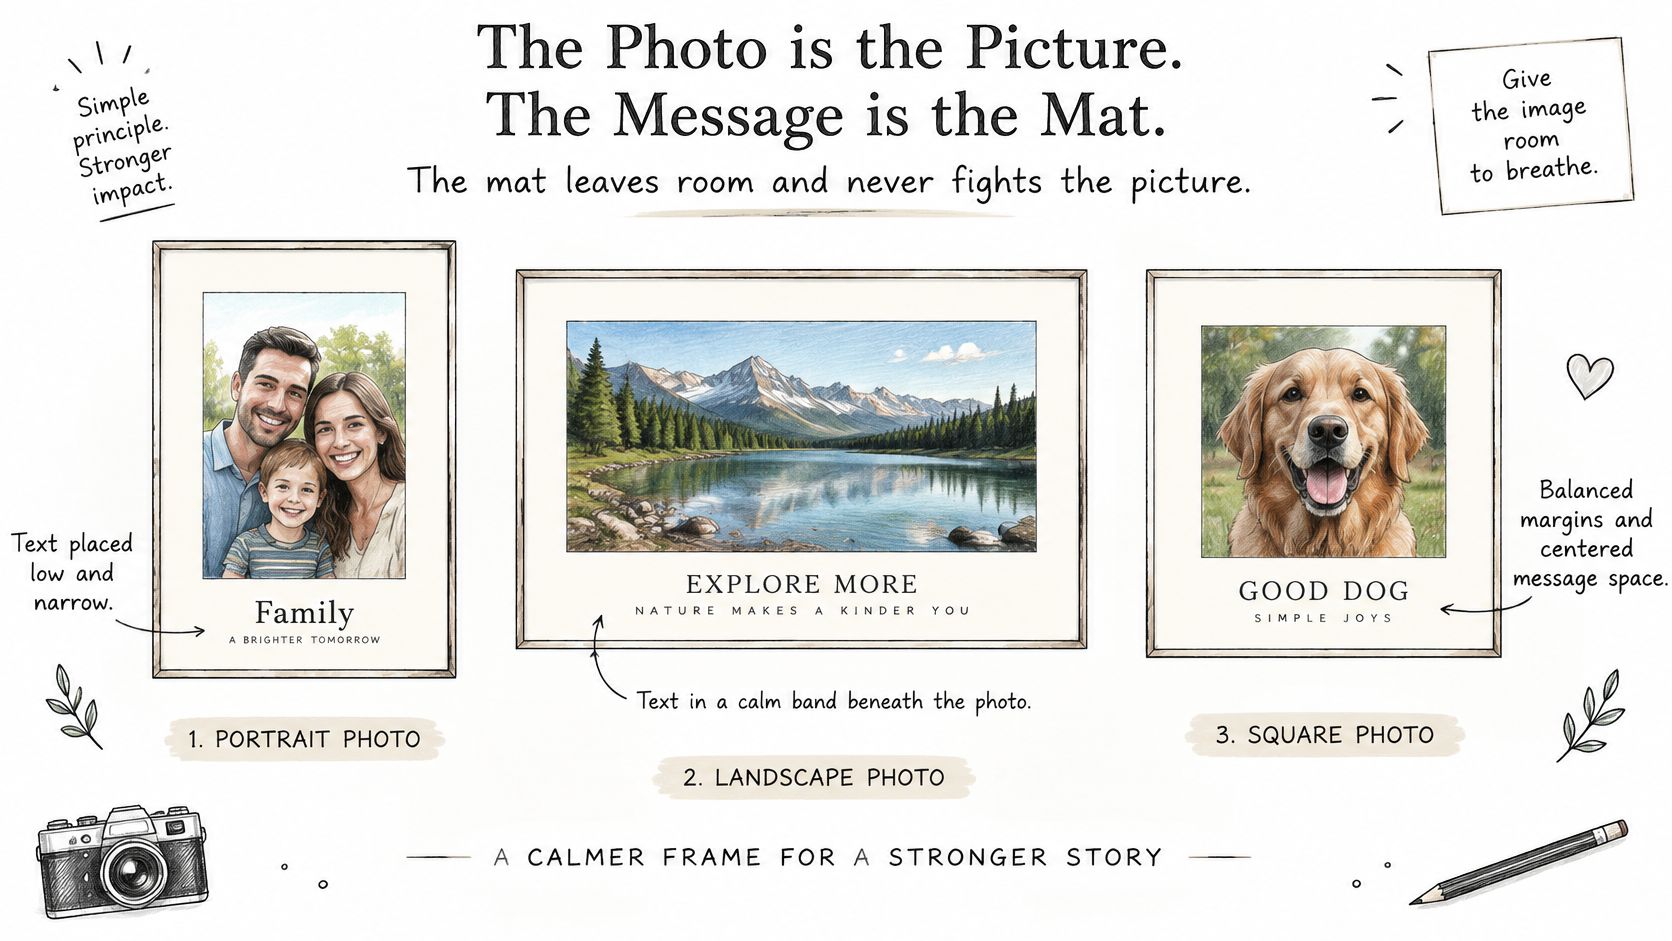
A portrait family photo with a quiet bottom band
Place the family photograph on the front and reserve a blank band below it for a short greeting. This works especially well when the people fill most of the frame and there's no uncluttered background for lettering.
Keep the band inside the trim-safe area rather than pressing the baseline against the bottom edge. If the photo is tightly framed already, reduce its placement instead of cropping someone's head to manufacture room for text.
Use a plain or lightly tinted band that relates to the photograph without matching its busiest colors. Read the greeting at the card's intended physical size, not only in an enlarged editor.
A landscape pet photo with open space
Say the dog sits toward one side of a garden photograph. Put the birthday greeting in the open area on the other side, leaving the animal's face unobstructed.
Grass, fur, and foliage make unreliable text backgrounds even when they look empty at first glance. Add a restrained solid panel if the lettering disappears against them, and keep the text away from the panel edge and fold.
The trade-off is simple: a smaller photo with a readable greeting usually works better than an edge-to-edge image covered in decorative lettering.
A holiday card with the story inside
For a year-in-review card, let the front carry a single strong photograph and move the longer update inside. Separate short paragraphs are easier to read than a dense block squeezed around a collage.
Choose a comfortable type size before deciding how much to write. If the message won't fit, edit the wording rather than shrinking everything until it looks like a disclaimer.
Keep approved wording in a separate text layer. Lettering generated inside artwork can contain malformed characters or wording you didn't intend, while independent typesetting preserves the submitted message.
Check the front photo at intended size, then inspect the inside message separately at that same size. They're read at different moments and need different kinds of space.
Writing the Message Without Losing the Personal Touch
AI drafting can save effort, but the recipient should recognize your relationship, not the drafting tool. A smooth greeting isn't automatically a personal one. The detail that matters may be an ordinary memory that a generic birthday verse would never mention.
Give the assistant a clear task: suggest an opening, soften an awkward sentence, or offer a few tones. Keep ownership of the names, shared memory, emotional meaning, and final wording. Don't let the tool invent an anecdote merely because it makes the message sound warmer.
Give the draft something specific to work with
A useful prompt describes the recipient and the moment without supplying unnecessary private information. For example, ask for a warm birthday note to a brother that mentions the rainy camping trip shown in the photo and avoids sentimental language.
Compare a broad wish for happiness with a sentence about still laughing over the collapsed tent. The second has a reason to accompany that particular picture. It also sounds more like a conversation between people who know each other.
If you're stuck on an opening, these ideas for things to write in a birthday card can help you choose a direction. Use a suggestion as a starting point, then replace interchangeable wording with something you'd say.
Use restraint for sensitive occasions
Sympathy, illness, apology, and relationship milestones need more care than a cheerful birthday greeting. Don't assume the recipient wants reassurance, humor, religious language, or a positive interpretation of what happened.
For an apology, name your responsibility without asking the recipient to comfort you. For sympathy, a brief acknowledgment and a genuine memory may be more appropriate than an elaborate verse. A beautiful photo won't repair an emotionally inaccurate message.
Run this content check before approving the wording:
- Factual accuracy: Confirm the names, places, and occasion. Remove any detail the assistant inferred rather than something you supplied.
- Emotional fit: Read the message from the recipient's position. Check whether the tone suits both the circumstances and your relationship.
- Recognizable detail: Include a memory, phrase, or small observation that belongs to this person rather than any recipient.
- Meaningful photograph: Choose an image they'll understand and appreciate, not the most polished picture in your camera roll.
A useful editing test: If you could send the same message unchanged to someone else, make it more specific.
AI can make personalization easier. But if you accept its draft without adding your own judgment and voice, the convenience can leave the card feeling less personal.
How to Upload and Preview Your Photo Card
Use the preview as a production approval, not a decorative thumbnail. Your job is to confirm what will be printed, where it will go, and what you'll pay before the order moves forward.
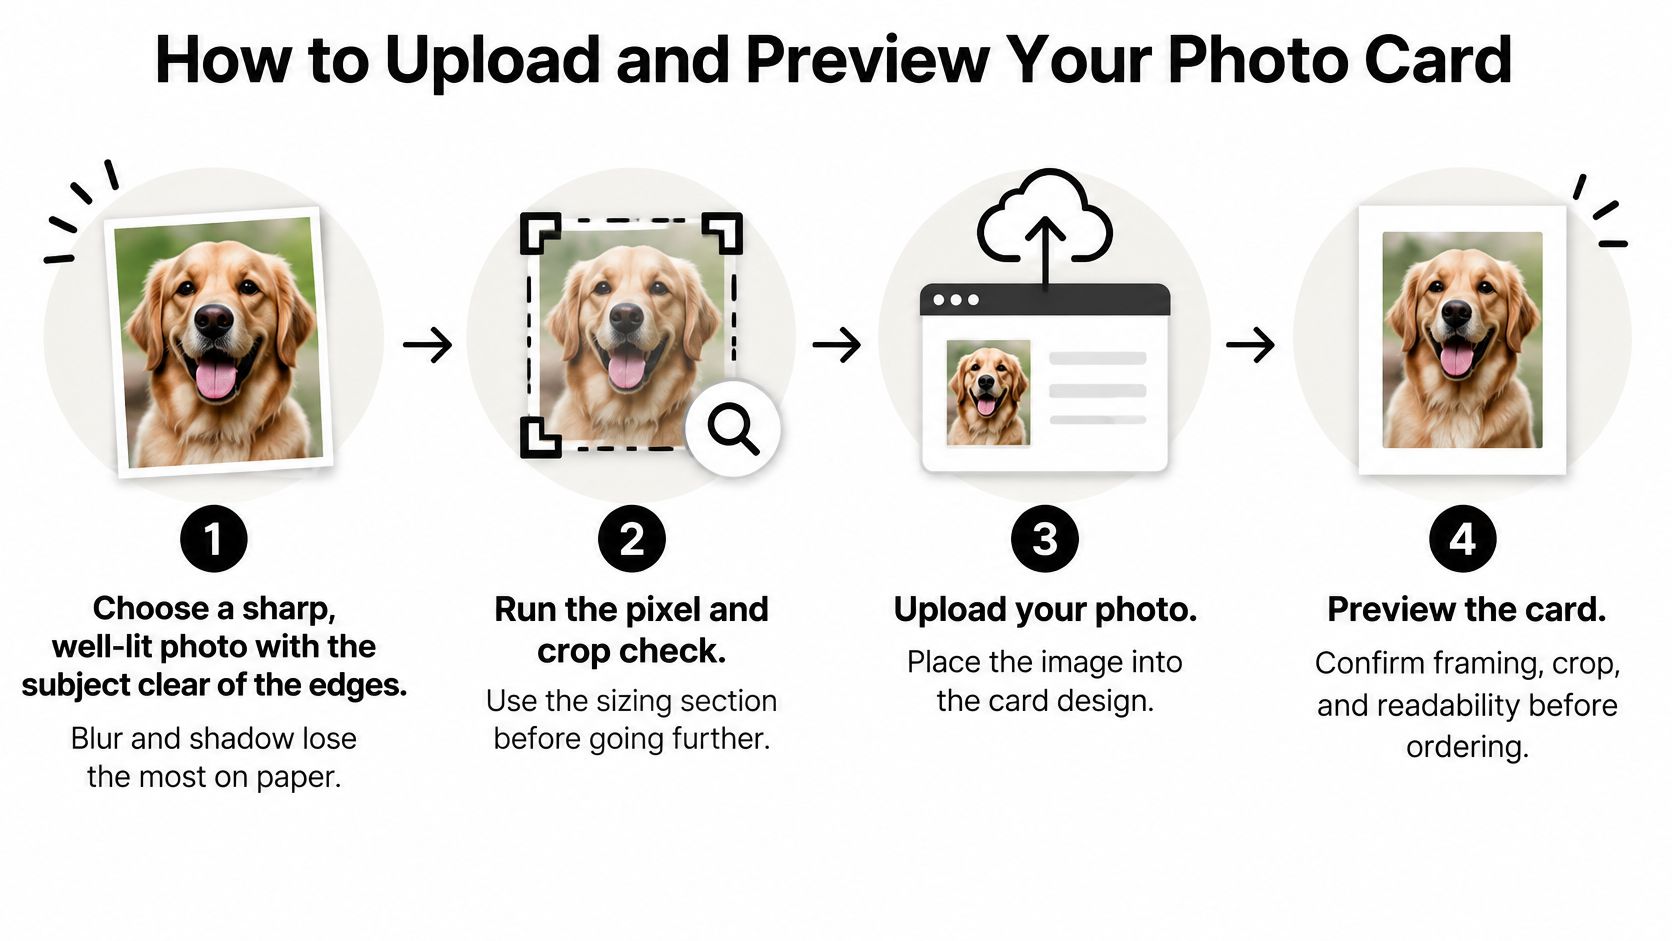
Prepare the file deliberately
Choose the original photograph. Start with a sharp, well-lit file in which the subject has room around it. Check the eyes or another important focal detail, because a pleasing thumbnail can hide motion blur.
Inspect the usable crop. Compare the retained image dimensions with the intended placement before spending time styling the card. A resolution warning deserves attention even when the miniature preview looks acceptable.
Set the composition in the template. Position faces and significant objects inside the safe guides, and identify which panel you're editing. Don't assume a decorative line is the trim boundary or that every visible editor margin will print.
Export a clean upload file. Use a high-quality JPEG in sRGB when you need a straightforward photo export, or retain a suitable PNG or WebP. Avoid a last-minute crop after export unless you recheck the resulting dimensions.
Inspect the whole order
Upload and check placement again. The editor may fill an image box automatically, producing a different crop from the file you prepared. Compare the uploaded composition with your intended framing rather than assuming the service preserved it.
Enter the message in its own field. Paste plain text and inspect paragraph breaks, apostrophes, and the sign-off. Copying from a formatted document can introduce spacing that wasn't obvious in the original.
Review every panel and the recipient details. Inspect the image closely, then read every name and sentence aloud to catch omissions and repeated words. Verify the street, unit, city, state, and ZIP Code against a current address, not a remembered one.
Approve, then check payment details. Confirm the selected design, eligible destination, envelope and postage inclusion, applicable tax, and final total. Save the order confirmation so you can distinguish an approved design from a completed purchase.
Don't approve from habit just because you've already spent time editing. If the preview is too small to inspect, use an available zoom or full-size view; if an essential detail remains unclear, resolve it before purchasing.
Final preview checklist
- Image: The focal point is sharp, and the crop hasn't removed anything meaningful.
- Message: The wording is correct, readable, and surrounded by clear space.
- Destination: The recipient and complete address match the intended delivery.
- Payment: The final total matches what you expect, including any displayed tax.
Plan Your Order Around the Delivery Date
An expected delivery time isn't a guaranteed arrival date. USPS service standards begin after postal acceptance, not when you start designing or approve the card.
The USPS service-standard changes FAQ explains expected rather than guaranteed delivery times and describes July 2025 changes that expanded two-, three-, and four-day First-Class Mail service-standard bands and added a day for some mail originating more than 50 miles from a regional processing center. That's why a generic promise that a card will arrive in a few days is a poor planning basis.
Who controls each stage between approval and arrival
| Stage | Who controls it | Guaranteed date? |
|---|---|---|
| Preview and approval | You | Not applicable; nothing ships before approval |
| Printing and packing | Cardly | No production-date guarantee established |
| Handoff to the postal service | Cardly | No handoff-date guarantee established |
| Transit | USPS | No; service standards are expected times |
| Estimated arrival | Service order status | No; an estimate only |
Work backward from the occasion
Set your latest ordering date by subtracting the stated production window, expected postal transit, and an additional buffer from the date you want the recipient to have the card. Account for weekends, holidays, and the provider's processing schedule rather than treating every calendar day as a production day.
For birthdays and anniversaries, an early card is generally easier to manage than a late one. For sympathy, send promptly without promising a specific arrival date. If the occasion is already imminent, a personal call or message can acknowledge it while the physical card follows.
Don't spend the entire available window polishing the draft. A 2023 survey of 2,000 Americans, reported by Grand View Research, found that 55% preferred a unique personalized message over a generic or AI-generated greeting. Preserve time for your own edit, but also leave time for the card to be made and mailed.
Resolve delivery questions before paying
An order-status page may show production progress without providing postal tracking. Ask what each status means and whether postal acceptance is separately confirmed.
Before committing, establish:
- Address changes: What happens if the recipient has moved, and can the destination still be edited?
- Cancellation: At what point does approval become an irreversible production instruction?
- Unsupported destinations: Will the service reject an ineligible address before payment?
- Tracking scope: Does visibility cover production, postal transit, or both?
Use a complete, current address with the correct ZIP Code. A familiar recipient name won't compensate for a missing apartment number or an outdated street address. This guide to sending a card in the mail can help you prepare the mailing details.
Set the send-by date before opening the design editor. Approve only when the address, preview, total, and estimated arrival window are acceptable, without treating that estimate as a promise.
Mail This turns your uploaded photo and approved message into a physical greeting card, with printing, addressing, and domestic postage handled through its fulfillment partner. Visit Mail This to start your preview, check destination eligibility, and confirm the finished design and total before paying.